Saturday 27 April 2019

Managed Chrome from the Cloud (p1)

A first look at the Chrome Cloud managed browser.


In a previous series of posts we looked at how you could manage Chrome and other Google products such as File Stream using Microsoft InTune in a school that has no servers.

At Next 19 Google announced a cloud managed browser capability which makes the whole process much simpler.  The two approaches are not mutually exclusive and using both together can bring dividends to the network admin.

In this post we’ll take a look at what the new managed browser feature brings to the table, show how the technology integrates with InTune and then follow up with a more in-depth look at the G Suite management console in a later post.


The introduction of a managed Chrome browser is a big event for the Google administrator.

Up until now the G Suite organizational structure could only contain two types of object, a user or a chromebook. Now it has a third - a instance of Chrome running on a Windows, MacOS or Linux platform The Chrome browser has finally taken its rightful place as a fully managed object within the console.

In the past it was possible to manage Chrome on the desktop but it always involved a third party system such as Microsoft Active Directory, Managed Preferences on Mac or, as we have seen, an MDM like InTune.

This approach has two major weaknesses.

First, there isn’t a unified policy set for the Chrome browser. For organisations adopting Chromebooks the user environment is governed through the G Suite admin console while the Windows/MacOS Chrome desktop experience is controlled through an entirely different mechanism.

Second, there isn’t a single reporting console for Chrome. The G Suite admin console can access Chromebook information but it’s completely blind to Chrome browser metrics. Tasks like examining what extensions are installed or reporting on the versions of Chrome deployed across various platforms was simply not possible.

For schools this might be an irritation but for enterprise it can be a deal breaker so Google have solved the problem in a pretty elegant fashion. There are no licencing implications and the feature is free across all recent G Suite offerings. It’s also very easy to get started and there are only a couple of prerequisites.
  • The admin console must have the feature pushed out.  More than likely you already have the update. If your Chrome management tab reads User and browser instead of just User and you can see the new group icon shown above you’re good to go.
  • You must have Chrome V73 or later running on Windows, Mac and Linux computers. Android and iOS are not currently supported.

Preparing the Console.
Managed Chrome needs to be turned ON as it’s OFF by default. It’s important to realise that none of these actions will affect Chromebooks. User-level policies apply to Chrome devices even if Managed Chrome is turned off. Also you can turn this on at the root without any immediate effect as the browser has to be enrolled before anything happens.

Note: If you’d like to play around first, create an OU  called “Managed Browsers” and set it here.

From the G Suite admin console Home page, go to Device management and then Chrome management.  Click on User and browser settings.

Go to the Chrome Management for Signed-in Users section and change the setting to Apply all user policies when users sign into Chrome.


This policy is little misleading. It should really read Chrome Management for Signed-in users and managed browsers. As we'll see quite a few of the console policies descriptions need to be updated to reflect the new responsibility.


Preparing Desktop Chrome.
Just like Chromebooks, desktop browsers have to be enrolled into G Suite and to do that you need to create an enrollment key.

From the Admin console home page, go to Device management and select Managed Browsers.

At the bottom, click  +  to generate an enrollment token.


A couple of important points to note about the key.

It’s only useful at the point of enrollment and has no function after the event. Once the key is presented to the browser (we’ll come to that later) and the browser taken under management the key can be deleted or updated without affecting devices already enrolled. In some respect it works like the joiners code in Google Classroom.

The generated key is specific to the OU level. Any chromebook enrolled with this key will be placed at the same point in the tree and take policy from that level. In this case the analogy would be the ‘follow the user’ feature for chromebook enrollment.

Note: If you are just testing at this stage create the key for the new “Managed Browser” OU and set your policies here.

A browser under management will display a new information tag at the base of the About dialog.


Managed Chrome Browser Policies.

For organisations running Chromebooks it’s worth noting that none of the policies under the Device section have any bearing on Managed Chrome. Device policies are strictly limited to Chromebooks, no red line has been crossed.  All policies relating to Managed Chrome are to be found in the User and browser section, hence the change of name.

So how does Managed Chrome differ from a simple synchronised Chrome user session ?

Put simply, once enrolled a user policy can be applied to the Chrome browser without the user having to authenticate with Google. The policies are set in the Chrome User and Browser OU that the browser object lives in.

If user attempts to access a resource such as GMail they will be presented with a logon box in the normal way but at this point the browser is already under cloud user policy control so you’re able define things such as valid logon domains - but not using the policy you might expect.
.
The domain filter for Chromebook authentication is set in the Device policy but as we know Device policies have nothing to do with managed browsers. Therefore the policy you need to set is User and Browser - Sign-in Within the Browser in the OU that the managed Chrome browser resides in.


Using the settings shown above the user will only be able to authenticate using a stmichaels.org.uk account, the value being controlled by a Google cloud policy and not local platform policy.

Note: Clearly the description of this policy isn’t entirely accurate and neither is the little light bulb which says the policy only applies to Chrome devices.  Some housekeeping is required on the console to bring everything into line.

Policy Precedence.
You now have three policy sets for the Chrome user experience. Using Google's own terminology they are ;
  • Platform Policy - These are the old policies pushed out locally through GPO or MDM.
  • Cloud Policy - Managed Browser.  User and Browser set at the browser OU.
  • Cloud Policy - Authenticated User. User and Browser set at the user OU

So what happens if you set the same policy in all three areas - which one applies ?

The rule is (pretty) simple.

The Cloud Policy - Managed Browser policy will always apply except for two situations.
  1. A policy set at the Platform level will trump any Cloud Policy.
  2. Any policy explicitly set at the User level and not explicitly set at Managed Browser level will be applied.
In plain English what happens is this.

The browser takes the full user policy set from the Cloud Policy - Managed Browser OU with the understanding that any Local Platform Policies will overwrite individual settings.

When a user logs onto Chrome any policies that are locally applied on the user OU will override policies inherited at the Managed Browser level so long as they don’t clash with a Local Platform Policy which always wins out.

If a Cloud and Managed Browser policy is Locally applied in both areas the Managed Browser version is used. At no stage are list based policies merged.

You can clearly see the effect of the policy interactions if you run chrome://policy


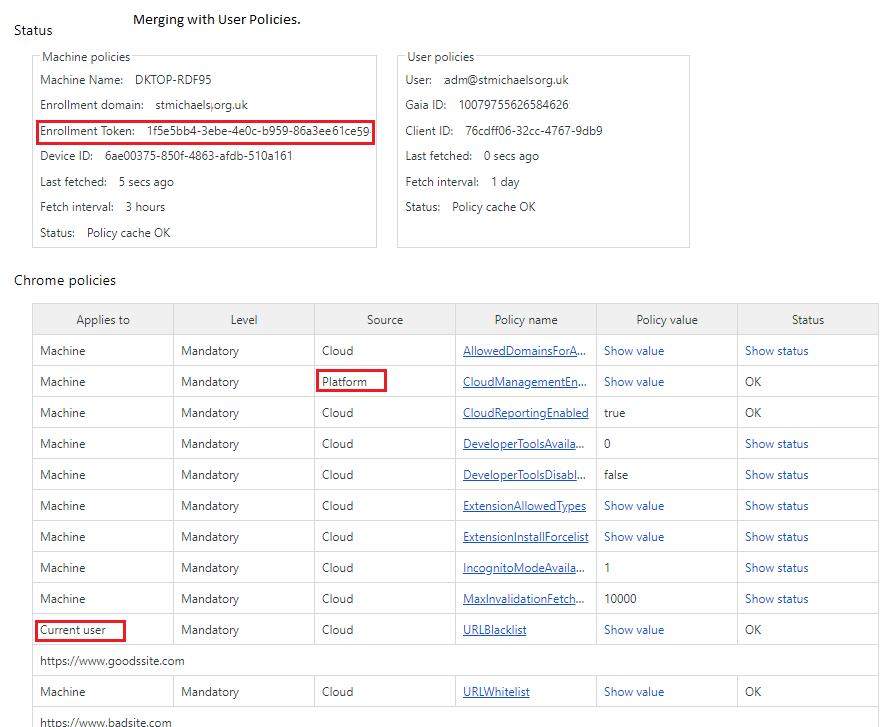
First thing to note is the enrollment token is now shown as part of the machine policy. The only platform policy is the one that applies the Cloud Management Enrollment Key, all the others are set directly from the cloud from the User and browser policy of the OU that holds the browser object.

The only exception is one policy that has come down as part of the user sync process because it’s set as ‘Locally applied’ in the user OU but only ‘Inherited’ in browser OU and so it has precedence.


Enrolling a Chrome browser.
As mentioned earlier enrolling a Chrome browser is very straightforward - you just need to present the enrollment key either as a platform policy or through the execution of a .reg file.

In our serverless school the platform policy will be delivered by InTune so let’s see how easy this is.

Note: If need you need a refresher on using InTune to push policies to Chrome please refer to the earlier posts.

Managing Chrome on Windows is now reduced to the deployment of a single platform policy which tells Chrome to look to your Google organization for all other settings.


In this case the OMA-URI value is;

./Device/Vendor/MSFT/Policy/Config/Chrome~Policy~googlechrome/CloudManagementEnrollmentToken

with the value set to ;

<enabled/> <data id="CloudManagementEnrollmentToken" value="1f5e6ab4-3ebe-4e0c-b959-86a3eeb4e0c"/>

Obviously you need you insert your own value for the Enrollment Token but after that you can manage Chrome using G Suite using the same policy set that controls Chromebooks.

Now you have Chrome on a Windows 10 desktop, fully managed from the cloud using an unified policy set within G Suite. Cool or what!

Next we’ll take a closer look at the features of the admin console that relate to managed browsers and see how the story gets even better for the serverless school.


Addendum

Taking feedback from other early users (Kim Nilsson and Roger Nixon) I've checked back on the policy application logic and there's one point that needs clarifying.

As described the process does indeed 'loopback' on the user policy looking for the Locally Applied status but only if the policy for the User OU has

Chrome Management for Signed in Users set to Apply all user policies when users sign into Chrome.


This has to be set at the browser and user account OU.  If not you only ever see browser policies.

>>>  Managed Chrome from the Cloud (p2)


Friday 12 April 2019

Managing Chrome in a serverless school (p2)

Deploying Google File Stream.


Anybody following this sequence of posts and expecting a simple deployment procedure along the lines of the Chrome browser is in for a bit of a surprise.

Unfortunately Intune for Education only recognises three native deployment types (web link, Windows Store item and packaged msi) and Google Drive Stream doesn’t fall into any of those categories so it’s time to roll up your sleeves and log into the Azure InTune portal.

The Azure InTune portal supports a wider range of application types including generic Win32 apps but these need to be converted to a specialised file format (.intunewin) before they can be used. As it turns out converting the Drive Stream executable into a .intunewin file is very straightforward.

The first step is to use the Microsoft Intune Win32 App Packaging Tool to pre-process the Google File Stream executable. The packaging tool wraps the application installation files into the .intunewin format and detects the parameters required by Intune to determine the application installation state.

Although this post references File Stream the process is much the same for any .exe installer.

Download the packaging tool and extract the executable (IntuneWinAppUtil.exe) onto a local subdirectory  - C:\Intune for example.

Download and copy the Google File stream exe installer file into the same directory.

Open a Command Prompt as administrator, navigate to C:\InTune, run IntuneWinAppUtil.exe and provide the following information when requested.

Please specify the source folder: C:\InTune
Please specify the setup file: googledrivefilestream.exe
Please specify the output folder: C:\InTune

Once the process is complete a file named googledrivefilestream.intunewin is created alongside the original file. This is your new “InTune friendly” install package for File Stream.

In Azure InTune navigate to Client Apps - Apps  - Add.


From the App Type dropdown select Windows app (Win32).


In the next section select the googledrivefilestream.intunewin file you have just created. In the App Information section fill out the relevant fields. Load up a logo file, it has no purpose but it looks nice in the console.


The Program section requires an install and uninstall command. Fortunately these are listed on the Google support site.

GoogleDriveFSSetup --silent --desktop_shortcut

%PROGRAMFILES%\Google\Drive File Stream\<VERSION>\uninstall.exe --silent --force_stop


In the requirements section check in both 16 bit and 32 bit operating system architectures and a minimum OS version of 1607 or whatever suits your deployment plan.


The detection rule is the only tricky thing left. This is the logic that InTune uses to determine if the software is installed. In this case we’ll look for a registry entry.

Select Rule Format - Manually Configure... and then Add.

Rule Type: Registry

Key Path: HKEY_LOCAL_MACHINE\SOFTWARE\Microsoft\Windows\CurrentVersion\Uninstall\{6BBAE539-2232-434A-A4E5-9A33560C6283}

Value Name: <blank>

Detection Method: Key Exists


The Tag section is not required. Select Save when complete and the installer file will be uploaded and the application prepared for deployment.


This normally takes a few minutes after which Google File Stream will be presented in the list of applications (type Win32) to be allocated in the same manner as the other apps.


It's important to realise that this process can only be managed using Azure InTune. Even after the app is created don’t expect it to appear within the InTune for Education portal.

In the next post we'll take a look at the new Chrome Managed Browser feature in G Suite and explain why things are about to get a whole lot easier for the serverless school.

Acknowledgements to Roger Nixon at Wheatley Park School UK for working through this example.

Tuesday 9 April 2019

Managing Chrome in a serverless school (p1)

Deploying and managing Chrome.


In a series of three posts we’ll examine some of the challenges a school IT admin might face managing elements of the Google ecosystem in a school that has Microsoft Windows... but no servers.

In particular we’ll take a close look at installing and managing the Chrome browser and follow that up by deploying Google File Stream to Windows 10 clients. In the last post we’ll take an early look at the new Managed Browser feature of G Suite and see how this is set to make life a whole lot easier.

To adopt a true serverless strategy that includes Microsoft you need to manage your Windows 10 laptops and desktops using the InTune MDM rather than the Active Directory + GPO + SCCM combination that has been the de-facto standard for the last two decades.

It sure was fun but goodbye and happy retirement.


As we have noted in previous posts schools can access two versions of the management console. InTune for Education simplifies the user interface and streamlines some of the common workflows while Azure InTune exposes all of the working parts. At each stage we’ll point out what's possible in the schools version and when you might need to drop down into Tune ‘classic’.


Deploying Chrome.
This is easiest task and can be managed entirely within InTune for Education console . As we have seen in earlier posts InTune has a native workflow to deploy files in the Microsoft installer format (.msi) and fortunately Google provides the Chrome browser in just such a package.

Therefore the first task to download the Chrome msi installer file from the enterprise site. Once that's done it’s a simple job to work through the wizard.


Navigate to Apps - Desktops apps and + New app.

It’s worth noting that InTune for Education apps deployed in the .msi format are classified as Desktops apps but in Azure InTune the same apps are termed (LOB) Line-Of-Business apps.

The dialog allows you to select the Chrome installer msi file which includes metadata that fills out the app name field. All the other fields are optional. No command line is required for Chrome as InTune imposes a silent install. It’s worth creating and uploading an icon just because it makes Chrome easy to identify in the console and it looks cool. When installing Chrome make sure the “Don’t check version” option is enabled. Enabling means Intune won't try to install an older version of this app if a newer version is already found on the device.


Once accepted the install package is uploaded to the Azure repository and Chrome added to the list of desktop apps available to users or devices. Pretty straightforward.


Once the app is assigned to a user or device group don’t expect it to be available immediately. The installer file is downloaded on a trickle feed and then installed as a background task. So long as you remain patient the process is pretty reliable.


Managing Chrome.
Google admins who manage Chrome in a Windows environment will be familiar with the chrome.admx template file that's used to extend the standard Windows GPO policy set to include the Chrome browser. However when you open up InTune for the first time there's no sign of the Chrome policies in either of the two platforms.

Therefore before you can manage Chrome there is a separate process to ‘ingest’ the chrome.admx template file into inTune. Once Intune has the full listing, each setting has to be individually entered using a fairly arcane format but the end result is that the Chrome controls are pushed out in the same way as the established GPO model.

It’s important to note that this procedure can only be managed through the Azure InTune portal. The InTune for Education console has no visibility of this process at all.

The first step is to download the chrome.admx file from the enterprise support site.

Using Azure InTune open Device Configuration - Policies - Create Profile.


The new profile dialog needs to be filled out as shown below. It’s important that the profile type is set to Custom. Also note that this process is for Window 10 devices only.


The settings section allows you to add a configuration to the profile. Windows 10 custom profiles use Open Mobile Alliance Uniform Resource Identifier (OMA-URI) settings to configure different features. The first one loads the entire chrome.admx template into InTune. Subsequent entries are used to set specific policies within the template.

To import the chrome.admx template select the Add option.


Update the dialog with the values below.


The OMA-URI value is:

./Device/Vendor/MSFT/Policy/ConfigOperations/ADMXInstall/Chrome/Policy/ChromeAdmx

Setting the Data type to String presents a list box.  Paste the entire contents of the chrome.admx file into the input field and save the dialog. This action provides InTune with enough information to understand the Chrome policy group but doesn’t set anything - that’s the next task.

Let's take a simple example, Forcing Safe Search.

Within the same policy add a second custom OMA-URI setting.


In this case the OMA-URI value is;

./Device/Vendor/MSFT/Policy/Config/Chrome~Policy~googlechrome/ForceGoogleSafeSearch

with the value set to ;

<enabled/>

Setting each policy requires you to know the appropriate OMA-URI (the registry entry) and the contents of the Value field (the registry setting). Fortunately, Google has provided a sheet and some examples that run through some of the common policies but it’s not a comprehensive list.

What happens if the policy you require is not on the list?

If you look closely each policy has a fixed pattern and with a bit of detective work and using the existing policies as templates you can work them out.

The simple on/off policies are controlled by the value=<enable/> field with the final OMA-URL suffix replaced by the string identifier for the policy. The string identifiers can be found by typing chrome://policy from Chrome or by referencing the Chromium developers site.

It gets a bit tricky when the value field is not simply on/off but requires a data list. A good example is the  PluginsAllowedForUrls which requires a list of URL’s.

In this case the values are separated by the Unicode character 0xF000 which corresponds to the encoded version: &#xF000 which is what you see in the string examples.

Unfortunately two of the most popular Chrome policies are not on the Google list.

Chrome – ADMX – BrowserSignin
Chrome – ADMX – RestrictSigninToPattern

The first policy forces users to sign in and ensures that the Chrome policies and settings are applied on users’ computers. The second limits user logins to organisational accounts.

An amended version of the Google sheet includes these policies and will be extended as other policies are assessed.

In the next post we’ll take a look at using InTune to deploy Google File Stream.

Acknowledgements to Roger Nixon at Wheatley Park School UK for authoring the additional Chrome policies and testing the settings.