Sunday 7 July 2019

Using Google to authenticate Microsoft (p2).


This is the second part of an extended post that describes how to use Google as an identity source for Microsoft Azure Active Directory (Office 365).


The next stage involves configuring Azure to pass authentication requests through to Google rather than handling them locally. Using technical terms we are creating a federation between the two platforms with Google acting as the identity provider (idP) and Azure the service provider. As before we’ll work through this example using theserverlessschool.net which is a custom domain in a Azure AD  tenancy.

Note: Each federation object acts on a single domain so it’s possible to have many custom domains within an Azure AD  tenancy, some federated to Google (or some other idP) and some locally authenticated.

All of the work is done from the powershell console so the first job is to install the modules listed below within a session running with local admin permission. You’ll also need details of an admin account for Azure AD.

Microsoft Online Services Sign-In Assistant for IT Professionals RTW
Microsoft Azure Active Directory Module for Windows Powershell.

The first module is a simple download. Once installed it’s loaded with the command.

PS C\:> Import-Module MSOnline

Then login to Azure AD using an admin account using the commands.

PS C\:> $Msolcred = Get-credential
PS C\:> Connect-MsolService -Credential $MsolCred

Creating the federation is a one line powershell command Set-MsolDomainAuthentication Unfortunately the number and complexity of the arguments turns it into a bit of a monster.

To get round this problem the input variables are read from an xml file and since most of the values are standardised you only need to update two elements before running the command.

The template xml file (dfs-pf-samlp.xml) can be downloaded from the original GitHub repository or from here.

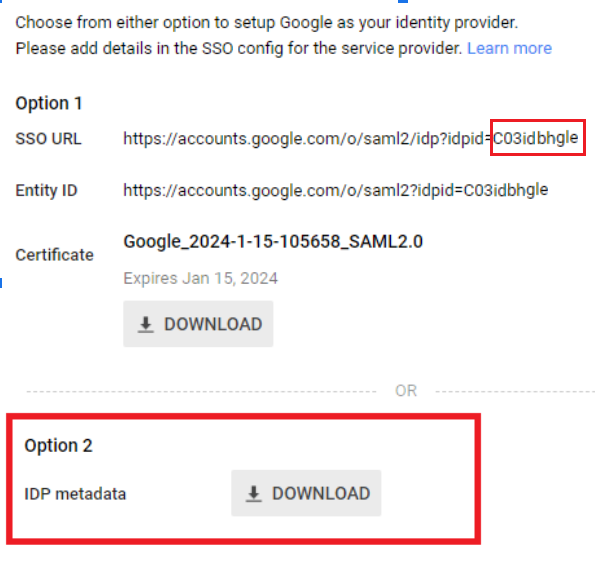
Before using the file you need to replace the string GOOGLESAMLID with your domains unique idpid recorded when setting up SSO in G Suite. The input  line should be similar to this:

https://accounts.google.com/o/saml2/idp?idpid=C03idbhgle

Note that GOOGLESAMLID occurs three times in the file and needs to be replaced in each location.

Lastly you need to carefully copy the certificate string from the IDP metadata file saved from the SSO setup process and paste it into the location below.

<S N="SigningCertificate"> YOUR CERTIFICATE GOES HERE </S>

A shortened version will look like this.

<S N="SigningCertificate">MIIDdHCCAly…...BAkTD0dv</S>

Make sure you paste as a single line and do not introduce any line breaks or extra characters.

Once that’s done we can create the federation using the command below, substituting theserverlessschool.net for your domain. The command is shown with line breaks but needs to be issued as a single line command.


Set-MsolDomainAuthentication -DomainName "theserverlessschool.net"
 -FederationBrandName $wsfed.FederationBrandName
-Authentication Federated
-PassiveLogOnUri $wsfed.PassiveLogOnUri
-ActiveLogOnUri $wsfed.ActiveLogonUri
-SigningCertificate $wsfed.SigningCertificate
-IssuerUri $wsfed.IssuerUri
-LogOffUri $wsfed.LogOffUri
-PreferredAuthenticationProtocol "SAMLP"


A couple of other useful commands:


Get-MsolDomainFederationSettings -DomainName "theserverlessschool.net" | Format-List
    Shows the federation settings for the domain in the  console.


Get-MsolDomainFederationSettings -DomainName "theserverlessschool.net" | Export-Clixml dfs-pf-samlp.xml
   Dumps the settings back into the config file.


Set-MsolDomainAuthentication -DomainName "theserverlessschool.net"  -Authentication Managed

   This command switches the authentication back to locally managed and effectively turns federation off. This is particularly useful as a fall back option but it also allows you to update the settings as the values cannot be changed while the federation is active.

Azure will now pass all authentication requests to Google for any non-admin account in the domain “theserverlessschool.net”.  So what does that look like ?

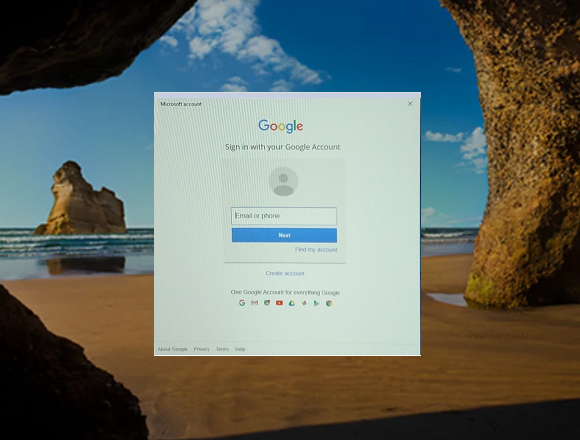
Open up a Chrome session in incognito mode, navigate to https://office.com and select Sign In. When asked for a user account enter an Azure username from your federated domain. After a short pause you’ll be directed to the standard Google dialog which will grant access to office.com.

So what happens if you try and login to an Azure joined Windows 10 device with the same Google user account. You might expect the same behaviour but that’s not what you see. The Windows logon box remains and the Google password is refused. Nothing has changed. So why is that ?

By default the conversation between the Windows 10 device and Azure doesn’t use SAML but WS-Fed (WS-Federation), a protocol supported by IBM and Microsoft but not Google, therefore the hand-off falls at first hurdle.

What you need is a Windows logon process that understands SAML not WS-Fed and with Windows 10 1809 edition you have exactly that.

The feature is off by default but can be turned on using a custom policy in InTune.
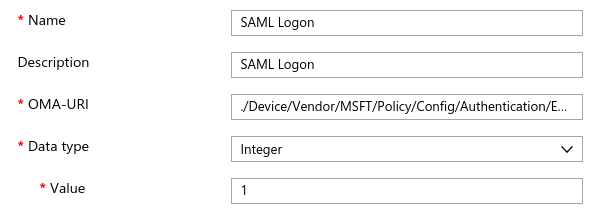

OMA-URl
 ./Device/Vendor/MSFT/Policy/Config/Authentication/EnableWebSignIn    


After deployment you are offered an additional option on a globe icon - Web Sign-In.


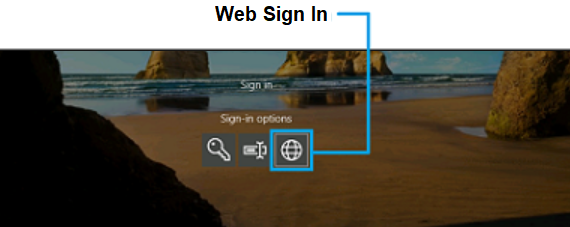
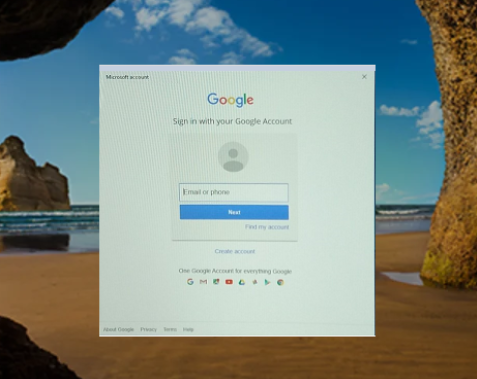
Select this option and sign in using your federated account. This time you will see the redirection and you’ll be presented with the familiar  Google login dialog which will grant access to the Windows desktop.

You have to enter the logon account name twice because Azure needs to know the username before it can offer the redirection. In the future it will be slicker and remember this is still a preview feature.


Summary.
In an earlier blog post I predicted it would be a while before we saw a Windows device using a Google account to authenticate.

A year later, here we are.
This could be used as an example of how wrong I can be but I’d prefer to think it reflects the pace of change and the general move towards open standards.


The new framework is becoming clearer by the day.

Cloud based user directories controlling MDM managed devices that host SaaS applications delivered through a store model backed by subscription licencing.

Google, Microsoft take your pick - they both offer the same vision. You can even mix and match.

The only thing you can be sure of is the fact that not a single element will require a local server.


Thursday 4 July 2019

Using Google to authenticate Microsoft (p1).

In a previous series of posts we examined how you could defer Google logons to Azure Active Directory (Office 365).  In this scenario a user logging onto a chromebook would be presented with a logon dialog from Microsoft and any subsequent actions accessing SaaS resources would be checked against the Microsoft user database rather than Google.  Using specific terminology the Google database was using Azure as the identity provider (idP) and was federated to that service to allow single-sign-on (SSO). This setup is ideal for organizations that have established Azure directory system and use the service with other SaaS providers. In this case Google is just another SaaS client for the Azure identity service.

While this suits some enterprises it’s not always the best solution for a new school ‘Going Google’.

Consider a school that has made a big investment in chromebooks and uses G Suite and Classroom for learning but still requires a Microsoft platform for front desk administration. These admin users will need an Azure AD account to authenticate with their new Azure joined Windows 10 workstations. You could operate two separate directories but this is messy especially if you plan to link both directories to a MIS system. You could also fall back to the first approach, using Google to defer to Azure and maintain all the user accounts in Azure but his seems to be the wrong way round when the majority of the users access Google resources. It’s a bit like the tail wagging the dog.

What you really want to do is make Azure use Google as it’s idP and maintain all the accounts using the G Suite admin console. You can then setup user provisioning for just the administration team and link the MIS system to directly Google. Much simpler.

The secret to all of this is SAML (Security Assertion Markup Language) an open standard for exchanging authentication and authorization data between an identity provider and a service provider.

In this case Azure is the service provider and Google the identity provider. It’s always been technically possible to configure Azure as a service provider. There are a number of commercial platforms such as Ping Identity and Okta that depend on that fact. The problem with using Google as the idP is the procedure isn’t well documented or even widely deployed. The Google documentation explains the Google side but stops short at explaining how you prepare Azure which, not surprisingly, turns out to be the tricky bit.

In this two part post we’ll walk through the process step by step. The end game will be the administration and provisioning of Azure AD accounts via the G Suite console and controlling access to Office 365 using the Google accounts database. Finally we show a Windows 10 device presenting a Google logon screen on boot which is a bit mind-bender when you first see it.

It’s a bit a long haul but stick with it. It should be noted that information has been drawn from a number of sources with a few blanks filled in and a deeper explanation provided. There’s also quite a few prerequisites that need to be in place before that Google login box appears so if you are planning to try this out please read this first.

Lastly credit must go to Roger Nixon who had the nerve to test the setup at his site (Wheatley Park School) and then place it at the centre of a new school opening this summer. That means it's already in the wild  - so let’s get started.


Domains. Organisations and Tenancies.
If you’d like to try this out you will need an Office 365 tenancy, a Google G Suite organization and a spare DNS domain. This example uses theserverlessschool.net as a secondary domain on the Google organization and a custom domain added to a Office 365 tenancy. The status of the domain is not significant so long as both platforms have it verified. Both platforms must use the same domain and the same form of the user logon address.

A couple of points worth noting at this stage.

The action operates at the domain level within Azure so once it’s turned on all non-admin accounts using theserverlessschool.net are passed to Google for verification. You can’t isolate a sub-set of accounts for local authentication.  If you need Azure service accounts you can always fall back to another custom domain or the built-in .onmicrosoft.com domain.

You can only have a single instance of the SAML object for Office 365 in the Google admin console. Once the service is up and running it will accept requests from multiple Azure tenants so long as they have the correct authentication. However the associated user provisioning object only connects to a single AD tenant.  Therefore while GSuite could act as an idP for many Office 365 tenancies it can only provision users into one.  Therefore if you need auto-provisioning it’s best to keep to a simple one-to-one relationship between the Google organisation and the Office 365 tenancy.

Note: This is unlike the action of Microsoft Azure. Because you can create multiple instances of the provisioning object each with its own login details and scope functions you can auto-provision users into many different G Suite domains.


Setting up Google.
When a user attempts to logon to Microsoft the request has to be passed to Google for authentication.  Therefore there are two parts to the solution. The first involves setting up Google to handle the request from Microsoft and the second is making Microsoft hand the request to Google instead of just checking with the local Azure database. The first task is fairly straightforward, the second not so.


Creating the SAML object.
The process uses Security Assertion Markup Language (SAML) to handle the authentication request so the configuration is managed using the SAML apps section of the Apps Marketplace in the console.


This section contains templates that allow Google to accept authentication requests from a whole range of SaaS providers including Office 365.

Because most of the information is already filled in setting one up is pretty easy.

Enter Office 365 in  the filter input box and select the object returned.


The details are presented as shown in the example below. They will unique for your domain.


You need to do two things at this stage. Make a note of the idpid that is at the end of the SSO URL. It will be unique to your domain and we’ll need it later. Also download the IDP metadata as we require some information from that file.

Click through the next step.


In Step 4 of 5 check in the signed response as shown below. Keep all other entries as default.


In step 5 of 5 use the drop down list boxes to set the fields as shown below.

Step through the last dialog and select finish. That’s it. You will now find an Office 365 object in the SAML section of the apps that you can update and assign to users.


The Microsoft SAML app is assigned in the same way you manage any other app in the console by setting it to ON against elements of the OU tree.


This part of the process is quite important as it defines the applications ‘scope’ within G Suite. Once it’s assigned to an OU users will find the Office 365 icon appearing in their waffle menu in Chrome. It also defines the subset of users that Google will respond to when prompted by an SSO request from Office 365. In our original scenario we would assign the SAML app to the OU containing the user accounts for the administration team and be confident that no other users would be allocated the Office 365 icon or the SSO service.

User Auto-provisioning.
At this stage you are also given option to set-up user auto-provisioning. This feature will create a user account in Azure AD to match a new account in Google. There are also rules to delete or suspend an account that shadows the same action in Google.

I don’t intend to describe user provisioning in detail as the process hasn’t changed much since it was documented in an earlier post. A couple of points are worth noting.

First, the user account that is created in Azure has no licences attached. To make it productive you will need to allocate licences manually and update Azure groups as they are not part of the process either.

Second, auto-provisioning had a tendency to suspend Office 365 accounts if they weren’t recognized. Thankfully this annoying characteristic is now fixed. If you manually create a user account in Office 365 within the same domain the service doesn’t automatically suspend it just because it can’t find the same account in Google.  This feature made the earlier version almost unusable except for the most basic situations.

Lastly, if you choose to deploy user auto-provision you have the option to use a Google group to control the user set. This feature is very useful.


The scoping rule now extends to users who are under the OU structure AND members of the provisioning group. If the user is removed from either the group or the OU the deprovisioning rules apply. This gives the admin close control over which users have access to Office 365 and will be authenticated by Google. In our example we would probably create a Google group (Office 365 Users) that only contains members of the Admin team that need an Azure logon. That way you could create accounts under the Admin OU without creating a user account in Azure. Similarly you could suspend an Azure user by removing the account from the group while still keeping the Google account active. Nice.


Summary.
To conclude, we now have an Office 365 SAML app created in Google that will accept requests from Office 365 for authentication on any domain hosted by the organization. However Google will only return a positive response to a user account covered by the OU that has the Office 365 SAML app turned on AND is a member of the provisioning group.

Any new Google account placed in the OU and the provisioning group will automatically be created in Office 365 and suspended if removed. For a single account the update action seems to act on a back-end trigger rather than a schedule and can take place in under a minute.


What’s left to do.
We still have to persuade Azure to pass logon requests to Google rather than handling them locally which does involve a few tricks. After setting an InTune device policy and we should have a Windows 10 device displaying a Google logon screen.


We'll cover all of that in the follow-up post.

For those who can't wait here's a preview provided by Roger Nixon.