The post describing how to integrate Chromebook Single-Sign-On (SSO) with Microsoft Azure AD (Office 365) remains a popular topic . It's been a permanent fixture at the top of the "You liked these" list for quite a while now.
Unfortunately, although the process is essentially the same, the Azure interface has received a complete overhaul during this period. As a result, anybody trying to follow the post as a step by step guide to setting up SSO for Chromebook is likely to be a little confused.
Therefore it’s probably a good time to revisit the procedure and take the opportunity to list some tips and tricks. To Microsoft's credit the new interface is far slicker and easier to navigate so there really no excuse in delaying getting your Chromebooks working Azure AD directory.
Note: At the point of writing Microsoft are in the process of rolling out another update which is currently in preview.
In this example we’ll set up SSO for a fictitious school (MA Academy) that has a Google organisation on the primary domain maacademy.org. The Azure directory must also hold maacademy.org as a registered subdomain.
Setting up SSO requires access to the Azure portal for your Office 365 tenancy but once logged in there are no additional licensing requirements. In the Azure portal search for "Enterprise” to bring up the Enterprise Applications blade and select + New Application.
This will take you to the Application Gallery where you have access to over 1000 templates for ready-to-use SaaS solutions. Google can be found by searching for “G Suite” and finding the application shown below.

Selecting the icon allows you to name your new application and then select Create. It can take a few minutes to build but once complete it will be displayed in the main list of all Enterprise Applications.
Note: If your organisation employs a large number of SaaS apps you may have to use the search option as the app list only displays the first 50.
Selecting the new app opens the Properties blade. Although there’s a lot of information here, most of the fields default to the correct values so there’s not much work left to be done. We’ll come back to this section later.
Next, select the option for Set up single Sign on and select the SAML card.

As you will notice only a few fields are marked as required, in most cases the default values will suffice.
Two items that are required are Identifier (Entity ID) and Sign on URL.
The Entity ID is a URL passed by Google that identifies it to Azure. It’s possible to have many Google organisations linked to a single Azure tenancy. In this case each would have their own application with a unique Entity ID.
In most cases the format below works well for this purpose.
google.com/<your primary domain>
Example: google.com/maacademy.org
It’s important to note that the domain MUST be the primary domain for the Google organisation even if you only plan to authenticate accounts in a secondary domain.
The other defaults can be accepted except for the Sign on URL which must be updated to include the G Suite primary domain and perhaps be pointed away from mail or drive as the signin target. In schools that are adopting Chromebooks as platforms for Office 365 is likely the Google Gmail and drive services will be disabled. In this case it makes sense to use the account info site as the sign on URL as this will be available for all active Google accounts.
https://www.google.com/a/<your primary domain>/ServiURLceLogin?continue=https://apps.google.com/user/hub

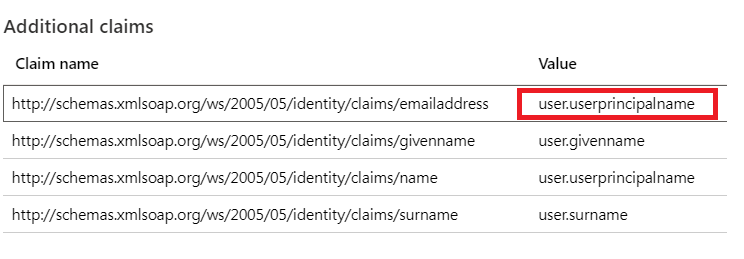
The default settings in the user Attributes and Claims section are suitable for most installations. One exception is for schools that don’t use the user MAIL attribute to store the G Suite logon identifier. Where user principal name attribute is used or some other custom field is employed the emailaddress claim name will need updating otherwise you will face an “email invalid’ error on logon.
After this has been done you may need need to review the value of User assignment at the base of the Properties dialog.
If you select ‘Yes’ users must have the app explicitly allocated to them otherwise authentication will fail with the error “User is not allocated to this application".
The relationship can be made through group membership or by applying the app to individual accounts. It’s sometimes useful to apply the app to a user account when you are in a testing phase however it’s likely a school will want all Chromebook users to be authenticated with Azure so this property is more commonly set to No.
That's pretty much it. All that remains is to pick up some information from the Set up G Suite Chromebook SSO card and head on over to the Google admin console.
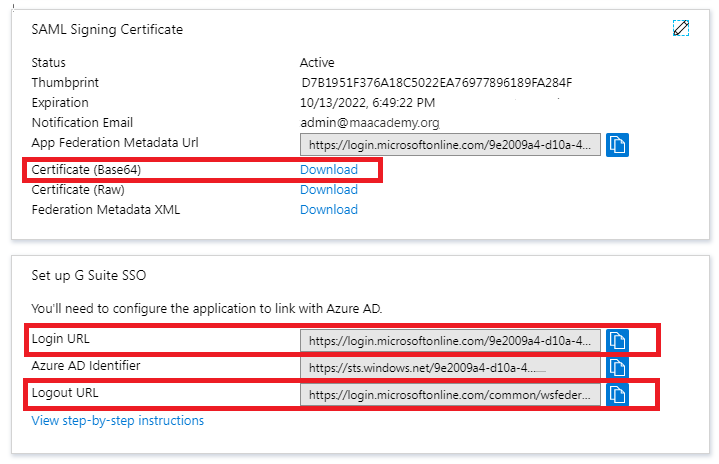
You will need the data from the Login URL and Logout URL and the Certificate (base64) from the card above.
Fortunately the Google dialog for setting up SSO in the Security section of the admin console remains unchanged.

Paste the Login URL into Sign-in page URL, Logout URL into Sign-out page URL and copy the data below into Change Password URL.
https://account.activedirectory.windowsazure.com/changepassword.aspx
`
As a final step upload the certificate file downloaded from the Azure portal, check the option for Use a domain specific issuer and save the dialog.
A word of warning here. The option to turn on SSO (Setup SSO with a third party identity provider) will apply to all accounts so it’s best to test it out first. The easiest way to do this is to limit the action of SSO to the IP address of your test Chromebook. You will need to add the IP address into the Network masks field using the format below and substituting in your local value.
XXX.XXX.XXX.XXX/32
Example: 10.4.34.123/32
The device and user policies to enable the Chromebooks for SSO are well documented by Google and the previous blog but before you update these settings it’s a good idea to check the config by logging in through a Chrome browser session. Once you have that working you can setup your Chromebook.
One last tip. Don’t test this with a G Suite user that has admin rights as these do not respect any of the SSO settings by design.
Good luck with your Chromebook SSO project. Although keeping up to date with the user interface updates can be a bit of a chore the changes have resulted in an environment which is a lot easier to manage and configure.
Other Information:
Microsoft have a useful how-to document you can reference which goes into more detail and also covers user auto-provisioning.
No comments:
Post a Comment