Wednesday 18 August 2021

SSO Profile Assignment arrives at last.

The sequence of posts describing how to federate from Google to Microsoft Azure AD (SSO) has remained one of the most popular subjects on the site.

However, ever since the process was first described it always came with a warning.

If you turn on SSO it applies to all non-admin accounts in the Google organisation. 

Historically the capability to scope SSO to a particular group of users was never provided, it was either ON or OFF for everybody. The IP subnet field gave you some control over testing and rollout but other than that it was all or nothing.

This wasn't too much of an issue for a school operating within a single organisation but for larger Multi-Academy Trust (MATS) that managed dozens of schools under one tenancy it was a bit of a show stopper. In this situation you couldn't turn on SSO for one school without affecting all the others. 

However now that SSO profile assignment has arrived as a beta feature, all that has changed.

SSO profile assignment is simple and easy to implement. The standard Single sign-on (SSO) with third-party identity providers (IDPs) dialog in the Security section remains unchanged. You need to fill that in with the same data as before.

What has changed is the fact that once you turn the profile ON this action simply marks the profile as being active from the root OU and provides you with a dialog to update it.

Therefore to fix SSO to a particular OU you need to edit the root entry to turn the feature OFF and then add additional entries at lower OU levels to override the setting and turn it back ON. Basically SSO now operates like all the other Google Apps features and settings.


In the example above SSO is turned OFF at the root and is only active for the Students OU.

Selecting the MANAGE option (above) displays the OU tree with the ability to select and edit the properties of each OU. Those OU’s with overrides set are marked with a grey dot (below)

Removing the settings from an OU is not quite as simple as selecting the REMOVE SCOPE option. You first need to clear the override by selecting INHERIT. The Remove Scope option then removes it from the list shown above.

As well as OU’s Google provides the ability to set SSO based on Groups and Users. This is a particularly useful feature if your OU structure does not map directly to the requirements for SSO.

Like other implementations of groups, assignment to a group or user can only be used to turn the feature ON and not as an exclusion


Conclusion.

Although still a beta feature SSO profile assignment worked exactly as expected in a recent implementation for a multi-site MAT and certainly removed a large amount of risk from the project. All in all, a great new feature that’s been long overdue on the G Suite Admin console.


Wednesday 14 July 2021

Returning the Windows 10 key from Powershell.

It's sometimes a useful skill to be able to return the Windows 10 key from a device that has lost a sticker.

Fortunately you can get the windows key from a simple Powershell command run as admin.


(Get-WmiObject -query 'select * from SoftwareLicensingService').OA3xOriginalProductKey


Microsoft Office 2019 and Office 2016

Press Windows logo key+X on your keyboard to open the quick action menu.

Select Command Prompt (Admin).

If a security prompt window is displayed, select Allow.

Using the command line to check your license type

Open an elevated Command Prompt window.

Type the following command to navigate to the Office folder.


For 32-bit (x86) Office

cd c:\Program Files (x86)\Microsoft Office\Office16\

For 64-bit (x64) Office

cd c:\Program Files\Microsoft Office\Office16\


Type

  cscript ospp.vbs /dstatus

and then press Enter.


In the example above the screen displays the Retail type license. If you have a volume license (VL) product, the license type is displayed as VL or Volume Licensing.


Thursday 17 June 2021

Turning off Hello for Business in EDU

IT managers using MEM to manage Windows devices for schools often struggle with Windows Hello for Windows (WH4B).  While the corporate world has a clear requirement for the type of 2FA that WH4B provides it's not that useful in schools. 

Unfortunately the default setting found in the Windows-Enrolment in the MEM console turns WH4B on and targets the All Users group and unlike other settings there's no option to edit this group assignment or add an exclusion policy.


In essence you can turn WH4B on or off for all users but that's about the limit of the scope control.

Another common complaint is that once you have noticed your mistake and turned WH4B off, this only affects new device enrolments, not devices and user accounts that have picked up the policy. While there are various workarounds for this situation it's not one you really want to be in.

However a preview feature in the MEM Endpoint Security section now allows you to enable/disable WH4B based on user groups, effectively providing a scoping control.

On the MEM console navigate to -  Endpoint Security - Account Protection and create a new policy.

The options are limited but you do have the ability to block Windows Hello for Business. If you set this against a a user security group WH4B is removed, exactly as you would expect.

Lastly you should note that the WH4W settings in the Windows Enrolment pane are the only ones that apply during OOBE and apply to the entire tenant and, as we have noted, this can’t be scoped. So if you want to remove the WH4B prompt during OOBE you would have to block it for everyone using the tenant wide setting but then turn it back on in the Endpoint Security - Account Protection section making sure you only assign to the appropriate user group.

Thursday 13 May 2021

Controlling MAM device enrolment.

During the early stages of the project a mistake that schools often make when adopting Microsoft Modern Management is to ignore the question of device enrolment and as a result thing can become unmanageable pretty quickly.

Without changes to the base settings Microsoft Device Manager is quite relaxed about restricting access to the enrolment process and a limited rollout of a six devices can quickly extended to many dozens by students downloading the Company Portal App and taking advantage of the generous personal enrolment allowance of five devices each.

Things get even worse if the admin allocates the students an Azure P1 premium licence because with the MAM Users scope set to All (default), any device registered with Azure AD using a school account will also also push the device into the MDM.

The solution is to do a bit of work on the MAM console to make sure the settings match the schools IT policy before things get out of hand.


You can use Device Restrictions to block hardware device types and set conditions on the operating systems but you need to be a careful that you don't go too far and also block auto-enrolment for any Autopilot rollouts you may have planned.

Although most of the options are controlled through MEM policies an often over-looked setting is located in the Azure AD - Devices section. 

  • Navigate your browser to https://portal.azure.com.
  • In the Azure Active Directory pane, click Devices.
  • In the Devices pane, click Device settings.
  • Check the option settings for  Users may join devices to Azure AD
If you are using an account that's out of scope you'll see the 801c03ed error during device enrolment . 


Setting an account as an enrolment manager doesn't override this restriction.

A great reference is a post by Samuel McNeill that explains the options in a clear fashion.

https://samuelmcneill.com/2020/10/30/how-to-blocking-personal-byod-devices-from-enrolling-into-intune-but-allowing-autopilot-enrollments/

It's an essential read for anybody planning to rollout of Microsoft Device Manager for the first time or who been given the job of cleaning up the device list.

Recommended.


Friday 2 April 2021

Troubleshooting in MEM/Intune (p2).

 Accessing the local log files.

When a school or business adopts remote management and mobility something becomes immediately obvious -  it’s often no longer possible to access a local machine to troubleshoot an issue. 

The device could be at home, offline or just turned off.  The user may not have the elevated privileges to run diagnostics, have concerns about remote sessions or be unable to securely transfer clear text log files over the internet. Suddenly support is a different world.

The Intune (MEM) console has a range of reporting tools that can provide insights into failed operations and these are a great place to start but sometimes you need to get hold of the local logs to get the complete picture.

On the client side Microsoft provides some excellent tools that can collate information into easily readable files. The most useful of these is MDMDiagHtmlReport.html. This can be generated by visiting navigating to Settings - Accounts - Access work or school. Find the Connected to “Your Organisation” banner and click the Info button.

The Info dialog is divided into three sections. In the last section you have the option to produce an Advanced Diagnostic Report by clicking “Create Report”. 

This action builds the MDMDiagHtmlReport html file in the C:\users\public\documents\MDMDiagnostics directory which contains information on the devices status and the policy settings being applied.

Alternatively you can select the Export your management log file link that is listed below the Connected to “Your Organisation” banner. This option goes a little bit further and creates a cab file in the same directory that contains both the MDMDiagHtmlReport file and a host of other diagnostics files including dumps of key event logs.

However useful these resources are the problem still remains that they are stored on the users computer and are not directly accessible to the support team

However a new MEM feature currently in public preview changes all of that.

If you navigate to the Devices - Window section in the MEM console and select a device, expanding the ellipses (…) should reveal a new option -  Collect diagnostics.


Selecting it will present a dialog asking you whether to collect diagnostics from the device. A simple click on the YES button starts the process.

The results can be found in Monitor - Device Diagnostics on the same device pane (below).

Initially the status will show pending but once the device picks up the request you should see the status update to Complete with the option to Download. If the device is online the action takes about ten minutes.


The process creates a zip file which you might expect to contain a set of files but instead it presents a list of directories numbered 1-50.

Since the feature is still in preview these directories might be renamed to give a better idea of the contents but at the moment it’s a bit like opening your birthday presents. A number of the directories contain a single file which is nothing more than a log of the process that created the rest of the logs (logs of logs) but some are much more useful.

All this could change but at the moment some of the highlights are listed below.

Spoiler Alert:  the MDMDiagHtmlReport can be found in a cab file in directory 44.


  • Directory 1 -11

Dumps of registry entries (.reg).


  • Directory 12 -27

Logs files for the collection actions (logs of logs)


  • Directory 28 -37

Dumps of various Event logs. (.evt)


  • Directory 38:

A set of event traces data files relating to Autopilot. To view an etl  file open with PerfView.exe.


  • Directory 40

Contains mpsupportfiles, a cab file that contains various diagnostic logs and event dumps relating to Windows Defender.


  • Directory 41:

The wlan-report-latest html  report created by the ‘netsh wlan show wlanreport’ command that shows wireless session information and related stats. 

Apart from a wealth of information in the hardware interfaces it contains a dump of the output from 'ipconfig /all' and ‘netsh wlan show’ -  two of the most useful tools in the box.


  • Directory 43:

The energy-report.html output file created by  powercfg /batteryreport tool useful in troubleshooting laptop battery usage and health.


  • Directory 44:

Holds a single file  mdmlogs-xxxxxxxx.cab which contains the files created by the Export your management log file link including the important MDMDiagHtmlReport file.

Other files include:

DeviceHash_<devicename>.csv - contains the device hash.

Setupact.log - Information and log events from upgrade actions.

Intune Management Extension logs.

  • AgentExecutor.log
  • ClientHealth.log
  • IntuneManagementExtension-xxxx.log

Event logs from key MDM providers.


  • Directory 45:

Log file output from the msinfo32.exe tool which summarized the hardware and software profile of the device.


  • Directory 48:

Cbs.log : Component-Based Servicing Log. This file contains detailed information from the most recent Windows installed updates.


Hopefully the directory set will be updated to make navigation through the file a bit easier. However even in the preview phase this is a welcome addition to the troubleshooting toolkit.


Thursday 11 March 2021

Troubleshooting in MEM/Intune (p1).

Basic Troubleshooting.

When IT admins are first presented with a problem it normally comes in a user centric form.

For instance;

William Gates can't access the finance package from his new laptop.

Probably 90% of all tickets are made up of users complaining that they can’t access a resource or something linked to their logon account is not working as they expected.

Unfortunately most management consoles (and MEM is no exception) are organised from an application or service centric viewpoint which can make it hard to get an overview from a users perspective. You can end up ping-ponging around the console opening up one service dialogs after another trying and get a handle on the issue but getting nowhere.

There is however, an excellent resource that should be the first port call for all help desk operatives - the well named but rarely visited Troubleshooting + support tool.


This might sound obvious but there is a tendency to drive straight into the detail without first gaining an general overview. The advantage of the Troubleshooting + support tool is that it organises information from the user perspective, summarising a wealth of information in an easy to read manner. Since most issues are caused by something stupid this can reveal the problem straight away. 

The top level dialog shows basic account information including whether the user has an Intune licence, a list of group memberships, application allocations, registered devices, application protection status and enrolment failures.


The drop down provides data on a number of other key areas such as compliance and configuration policies and enrolment restrictions and a number of other key areas.  Selecting the information takes you directly to the service configuration dialog page which is a real time saver.

A good approach would be to find a user that works and then use the summary features of the Troubleshooting tool to find the difference between the two user states.  It’s not going to work all the time but it's a recommended first step.

Part 2: Accessing the Local Log files.

Monday 1 March 2021

Universal Print Revisited.

The print subsystem is one of the last hurdles that a school or business needs to overcome to remove the dependence on on-premise servers.

Ideally the collaborate workflow and document sharing mechanisms of platforms such as Microsoft 365 and Google Workspace will eventually replace the traditional method of transferring data using wood pulp but that may be a little way off yet.

In the interim, Microsoft has introduced  Universal Print, a system similar in architecture to the now defunct Google Could Print that allows Windows 10 users to print to a device anywhere on the network through a cloud based connector.

A number of excellent blogs and video resources have been created that explains how Universal Print works but it's worth repeating a couple of points.

Universal Print (UP) is still in development and is missing some key features. The most obvious being that native hardware support is missing from most printer ranges. In fact, at the time of posting I can only find one manufacturer Lexmark that supports UP through a firmware update.  The models are listed here.

Licencing for Universal Print is bundled as part of the Microsoft E3 licence. Schools looking to move to Modern Management should be adopting Microsoft E3 as standard. If your school subscribes to Office 365 with Enterprise Mobility + Security this is not enough to get Universal Print. For each user that accesses a printer you'll also need Windows 10 E3, E5, A3 or A5. The client also needs to be running Windows 10 version 1903 or later.

Universal Print doesn't currently support 'Follow-Me' or ID card management. You'll need a bolt-on service like Paper-Cut to provide that. This feature is pretty much top of the product roadmap as it's absence is a show-stopper for any type of enterprise deployment. 

Lastly, the mapping of printers through Intune (Endpoint Manager) is a little clunky. I'm pretty sure this is by design, Microsoft doesn't want you to be printing or mapping local drives in the future. However it can be done and this useful post shows how.

   Deploying Universal Print Printers With PowerShell & Intune

So work in progress. If you need a simple system that supports basic print functions without the inconvenience of a local print server Universal Print, even in the preview form might be for you.

Thursday 25 February 2021

First Look at Azure Active Directory Connect Cloud Sync

New schools setting out on the Microsoft 365 platform can look forward to a future without on-premise servers, using Azure AD as the directory service and InTune (Microsoft Endpoint Manager) for device management. 

For existing schools, moving to the cloud while maintaining on-premise Active Directory isn't quite so easy.   Local resources such as printers and file shares are protected by local AD while cloud resources require Azure AD accounts. This means two different user databases that have to be maintained and updated.

Fortunately Microsoft has always provided an application to make this job easier. 

The best known is Azure Active Directory Connect (AADC), a tool that has been ‘rebranded’ several times over the years.  Administrators may also know this utility as the Directory Synchronization tool, Directory Sync tool or just DirSync.

Basically AADC is an application that synchronizes the on-premises Active Directory Domain Services (AD DS) users to the Azure AD tenant. As well as account provisioning it can also transfer a password hash that delivers a seamless logon experience for the user across both platforms. Although it's possible for changes to move in the opposite direction (password updates in the cloud are reflected in local AD) for most setups this is a one way trip - changes in on-premises Active Directory are reflected in Azure AD.

Azure Active Directory Connect has been a workhorse for Azure deployments but it has a number of limitations, some of which are particularly relevant for schools.

First, only one instance of AADC can be attached to a single Azure AD tenant. For larger educational trusts that are planning to consolidate multiple sites, each having their own Office365 organization, this provides quite a challenge. Currently the only solution is to ensure network level connectivity between the domain controllers in each forest so that the sync requests can be channelled through a single AADC instance. For medium sized companies that have a corporate WAN in place this isn’t a problem but for an educational trust trying to incorporate a dozen small primary schools, all using different internet providers, it’s a major headache.

Second, AADC requires a hosting device and in some cases that means dedicated server. If the school requires resilience or some degree of fault tolerance you now need two servers. For schools running a virtual infrastructure that requirement can be absorbed but for smaller sites it’s an unwelcome burden

Lastly although the ease of setup has improved over the years some expertise is still required to install and configure AADC which is largely managed through the onsite application rather than the cloud.

In response, Microsoft has rewritten Azure Active Directory Connect (AADC) from the ground up to create Azure Active Directory Connect Cloud Sync (AADCC).  Disregarding the confusing naming convention this new addition is a real winner for education

Lets run through a few of the new features.


First, AADCC can work alongside existing installations of AADC, This is because multiple instances of AADCC can connect to a single Azure organization, each managing a separate domain namespace, a killer feature which removes one of the biggest limitations of AADC. In the new model a fully detached AD forest with AADCC installed can feed into a single centralised tenancy, no WAN required.

Second most of the configuration and logic has been moved into the cloud meaning that the local install is extremely light. The only requirement is domain-joined Windows 2012 Server with SQL Server 2012 Express LocalDB (a smaller version of SQL Server Express) installed.

Lastly the software has no additional licencing requirements and has a simple deployment model. Installing multiple active agents provides high availability

How does this help the adoption of Modern Management techniques in a Trust or District model?

Up until now amalgamation of schools into unified tenancy model has been hampered by the fact that only one site can host the AADC. A second site that wished to run with hybrid identity would need ‘line-of-site’ of the hosting sites domain controllers. 

So long as all the other sites only used ‘cloud only’ user accounts you didn’t have a problem but if two large schools, both with a detached AD forest wanted to move to Modern Management while maintaining access to local file shares through hybrid identities, you had a problem - until now.


So what's the drawback to using AADC over AADCC ?

The new tool does not allow Pass-Through Authentication. Currently passwords are checked against a password hash stored on Azure. Also there’s no support for writeback for passwords, devices or groups but other than those two items the functionality is much the same. 

This video from the recent Ignite Conference gives a good overview which includes some configuration and install instructions.

It’s hard to overestimate the importance of this new capability to the adoption of Microsoft Endpoint Manager as a viable management platform.


Tuesday 2 February 2021

Managing Local Groups with InTune

For most IT administrators control over local user groups is an important part of the management process. Unfortunately for Windows devices that are Azure joined this has always been a bit of a challenge.

Working with InTune there was a CSP Policy - RestrictedGroups that you could use but it had a number of limitations.

  • It didn’t support groups, only user accounts.
  • It had an overwrite feature – it simply replaced the original user list with users in the policy set so the results were a little unpredictable. If a user account had been added to the Local Admins group to support a legacy application it would be removed when the new policy set was applied. You couldn’t create policies that layered accounts into the group.
  • It only controlled the local Admin group, not any of the other in-built local groups.

However with Windows 10, version 20H2 you get a new feature – the ability to control access to local groups by nesting an Azure AD security group.

The initial setup is a bit of a challenge but once done it’s a useful tool to have at your disposal.

The first job is to create a Azure AD security group to contain your new local admins, let's call it  - All Additional Local Device Admins.

The second task is to find the SID of your new group.

Unfortunately you can’t read the information from the web UI because it doesn’t display the SID.  However it can be found with the Graph API/ Explorer using the Group Object ID which is presented as part of the Group properties page.


With the Object ID recorded, login to the Graph API/ Explorer and run a GET query using the form of the request below.

https://graph.microsoft.com/v1.0/groups/<your Group ID>


The group metadata will be displayed in the results window and this will include the SID. Record this value.

This next task is to create a policy that uses the SID to embed your AD Azure group into the local Admins Group.

Navigate to 

        Microsoft Device Management (Intune) - Devices - Windows - Configuration Profiles

Create a new Configuration Profile - type Custom. Provide an appropriate name and description.

Add a new OMA-URI setting using the ID below for the OMA-URL identifier.

       ./Device/Vendor/MSFT/Policy/Config/LocalUsersAndGroups/Configure


The payload for this policy is in the Value field.

It contains a snippet of XML that defines the action. The options that you can incorporate can provide a lot of flexibility allowing you to add or overwrite the contents of any local group but for the moment let's keep to the original requirement to update the local Admin group.


<GroupConfiguration>

<accessgroup desc = "Administrators">

<group action = "U"/>

<add member = "S-1-12-1-3360748891-1147449691-4205429123-2160019913"/>

<remove member = ""/>

</accessgroup>

</GroupConfiguration>


The code contains the instructions to update “U” the “Administrators” group by adding the SID “S-1-12-1-3360748891-1147449691-4205429123-2160019913” which we already know references the Azure Group All Additional Local Device Admins

The XML has a number of different action types including Restrict “R” which provides the same functionality as the RestrictedGroups/ConfigureGroupMembership policy setting.

You can get full list of actions and options here.

Save the policy and assign it to a suitable Device security group. There’s no option to select a single device so it’s best to test it out on a test group first before trusting your luck (and job) to All Devices.

You will now find that adding an Azure AD user account to the All Additional Local Device Admins group will grant admin rights on a policy refresh. Even better, removing the user will remove admin rights on the next login.

If you use the local MMC to view the members of the Admin group you can see the new Group account added, but only as the SID.The name is not resolved.

Of course there’s no reason why you couldn’t use the same technique to control the membership of other local groups such as Backup Operator. Just be aware that although this works with all Windows 10 editions, other than Home you need to be on version 20H2 to get this new feature


Friday 29 January 2021

Managing Policy in G Suite and Intune

Following on from some earlier posts looking at the management process in both Microsoft InTune and Google Workspace it’s worth having a closer look at user and device policies because the models diverge quite a bit at this point.

In Google Workspace there is a clear division between a policy that applies to a device and one that affects the user experience. In fact, other than a few examples I can think of the two policy sets are completely unique.

If you then move into the Microsoft space this division breaks down entirely. Here you have a single unified policy set which can be applied at either the device or user level.

To give an example, using the Microsoft approach you are able to set a policy which controls an aspect of the user environment and apply it at the device level. The result will be that the feature will be set regardless of which user logs on.

Using Google Workspace that's not possible. You can’t set a policy that controls the user experience and apply it to a specific Chromebook. 

Google Workspace has a kiosk mode which does something similar but this does not apply to authenticated user sessions.

Although this sounds a little restrictive it does make things easier to maintain and troubleshoot. You never have to check if a policy is being set by the device or the user object and there is never any conflict resolution.

Not surprisingly Microsoft suggests an simple approach to user and device policy.

“If you want to apply settings on a device, regardless of who's signed in, then assign your profiles to a devices group. Settings applied to device groups always go with the device, not the user.”

“Profile settings applied to user groups always go with the user, and go with the user when signed in to their many devices.”

The difference between the two platforms is that while Google Workspace imposes these rules, with Microsoft it's just a recommendation. Microsoft provides flexibility but this comes with added responsibility and complexity.

A second major difference is that, in general, Microsoft policies are applied through a group structure You can create a policy and then apply it to single or multiple groups and those groups can be nested.  To also have the ability to create groups that contain users  - and groups that contain devices and apply both to the same policy set. One last level of complexity is that groups can be be marked as either applied or excluded for each policy - with exclusion taking precedent,

Now just because you can do these things doesn’t mean you should and in fact there are good reasons why you really shouldn’t.

Again Microsoft best practice strongly recommends you do not mix grants and exclusions using user and devices groups as the results “may not be what you want or expect”. They provide a useful table which is really no more than common sense.

Keeping it simple and granular is going to be the best approach working with Microsoft policies.

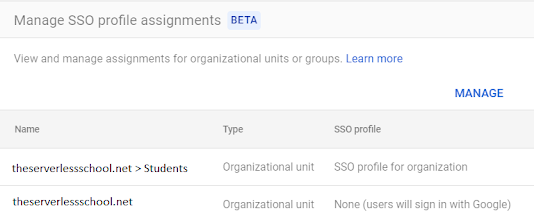
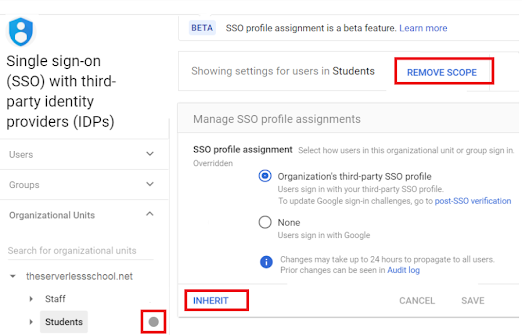
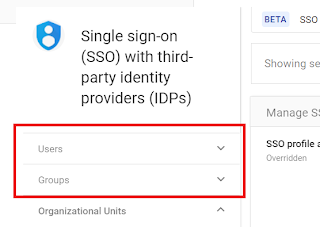
For both users and devices Google Workspace uses a hierarchy of organisational units to apply settings. Policy is determined but the object's position in the tree and the inheritance at that level. The major advantage of this approach is its simplicity and ease of troubleshooting but it can be difficult to incorporate exceptions to the rule. For this reason Workspace is stealing a page from Microsoft and incorporating the concept of group exclusion. A user set can have a policy applied based on the location in the OU tree but the setting can be overridden by group membership.

Typically, you would apply services settings to OU's and then make exceptions for some users. For example, you can restrict YouTube content for accounts but let some groups view all videos or approve videos. In all cases the policy set by the groups overrides the policy set at the OU.

Not all services allow this function. The ones most commonly used by education include ;

  • Directory (Profile editing)
  • Calendar
  • Currents
  • Drive 
  • GMail
  • Google Meet
  • YouTube

Since Google Workspace has no concept of a device group these actions apply to users only.

Lastly both platforms have a different way of handling policy negation.

Google Workspace administrators are used to working with policies that have distinct values (ON/OFF) with each setting having a default value. Also since each device or user object must exist somewhere in the OU tree every policy has a setting. The amalgamation of all the settings  defines the profile.

This isn’t the case in the Microsoft world. The policy set is a variable array with elements being added or removed as an assignment moves in or out of scope. The challenge occurs when a policy sets a value to ON but then moves out of scope without another value being explicitly set.

Does the values return to the original setting, a default or remain the same ?

The answer is “it depends”.

The settings are based on Configuration Service Providers (CSP) and each CSP can handle profile removal differently. Some might revert to default values, others do nothing. Microsoft's advice is to work explicitly with each value that needs precise control.

For instance if you have restricted a user from a desktop service, simply removing the user group from the policy scope may not be enough to grant access,

To change a setting to a different value, create a new profile, configure the setting to Not configured, and assign the profile to the device. Once applied to the device, users should have control over the service,


Microsoft InTune and Google Workspace, two management models, each with their own strengths and weaknesses. Not better, just different.